Monday, February 28, 2011

6 months ago...

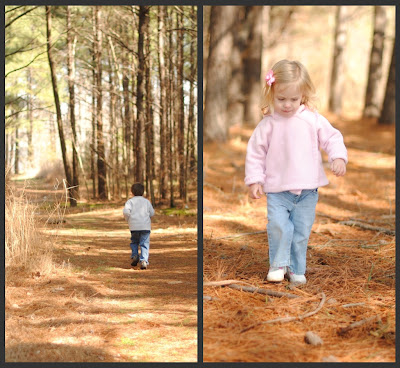
Six months ago, my babies looked like this:


Now, they look like this:


Allie Ruth looks more like a toddler and Landon has lost a tooth!
Allie Ruth has had two hair cuts and Landon, I am sorry that I tried to shave your hair and I will never do it again, Love Mom. 

The weather is getting warmer and spring is coming very soon. We spent Saturday morning at the park. We went to the "big park" which is another park that is close to our house. Its fun to walk or ride your bike there but you have to have a lot of time, so we just went in the car this time. 

We had fun swinging.


Then in true Allie Ruth fashion, she realized that she is in a different swing than Landon. And since she has to do everything he does...


She requested to switch swings. She seemed a little scared at first. But in true Landon fashion, "I will help you Allie Ruth!"

A little slide action:


Then Landon decided it was time for a nature walk.


Landon was our leader, while Allie Ruth was a little unsure! 


Sweet babies! Can't wait to see what you look like six months from now!!


Friday, February 25, 2011

Fauxtography Friday!

Lesson 2 part 2:  
 Finding the balance with aperture, shutter speed, and ISO. 


What we have learned:
Aperture- you need a lot of light in order to use a high f/stop like f/22.
Shutter speed- you need a lot of light indoors to use a very high shutter speed.

To get a correct exposure your f/stop and SS need to balance to let in enough light to expose your image. This is were your built in meter on your camera comes into play. Your exposure meter looks like a scale and is located at the bottom of the viewfinder. 


When you focus on an image, if the line on the meter is on the minus section, your image is underexposed. If the line is on the plus section, your image is overexposed. If the line is centered, you have the correct exposure. * Now, I have read that you might need to meter a little to the plus or a little to the minus, depending on your camera and style of photography. 


When you use Manual mode, you need to use the meter to make sure you have the correct exposure. If you already have your ISO set, then you are really just make two choices, SS and Fstop. * What have I been so scared of??


You can do it!!  


Ok, so I turned my camera to the manual mode and practiced indoors and outdoors. These photos are not really good or interesting but I did take them in manual and did understand a lot more about how my camera works.


These are some flowers that a sweet student gave me for Valentines day:)


Tree right outside my classroom.


Another tree.


My flowers two weeks later still look pretty:)

Hopefully this weekend, I can photograph some more interesting subject matter!


Tuesday, February 22, 2011

Tutorial Tuesday!

Pocket Photo Frame

Supplies:
-Canvas or Hard board
-Clear Vinyl 
-Fabric

I got these canvas prints at Target for the popular Target price of $3.24. 
I did not like the picture but figured I could do something with them later.


You can get the clear vinyl from any fabric store.


I made this bib for Allie Ruth's first birthday and really wanted to try sewing with vinyl again.

First I cut my fabric, leaving enough fabric on the sides to wrap around the canvas. 
Then I made a paper template and outlined it with chalk. 


I wanted my pocket to hold a 4x6 picture, so I cut the vinyl pieces to measure
 4.5x 6.5. 

Then I laid them out on the fabric were I wanted them to go.
To get the vinyl to lay flat, you can put them in a book and they will straighten out quickly. 

Here is were things started to go south with this project. Sometimes the ideas in my head don't quite work out. And I have been in a sort of creative slump lately. 


Originally, I wanted to sew the vinyl straight to the fabric. Well, this did not work at all! The fabric was bunching up and the vinyl was sticking to the presser foot. Very frustrating! So I took a break from working on it. I thought about it for a while and decide to sewing bias tape around the vinyl and then hot glue them to the fabric canvas. Hey, when all else fails, bust out the hot glue gun!!


I put a piece of painters tape on the vinyl so it would not stick when going through the sewing machine. I  had some blue bias tape, so I sewed it to the sides of the vinyl leaving it off one side for the opening. 


This is what a finished pocket looks like. 

I used some spray glue to hold the fabric in place on the canvas and then folded the corners and hot glued them to the back. 


Then I hot glued my faux sewed pockets to the fabric covered canvas. 


Not really loving this, but Landon likes it and he can change out the pictures whenever he wants. Or put other things besides pictures in there. 

What I am loving:


Landon's drawing of our family!


He spelled his name with the letter magnets and we did not have another "N" so he wrote it in!


and


The sign for his door that he informed me that when its on there that means no one can come in... 
good try buddy, I own that room:)


Monday, February 14, 2011

Happy Valentines Day!

All you need is...


This little photo shoot did not quite turn out the way I had it planned in my head, but hey, I still love it!
They are my little Valentines and I love them! 


What's not to love, the shirt asks?? UM, maybe the fact that you will not look at the camera!!

Sunday was Uncle Bub's real Birthday, so we sent him a birthday message!


Uncle Bub was back working on the boat. We hope he had a great day!

We did a little four wheeler riding!

Allie Ruth was not really enjoying her ride in the trailer. Landon was kind of going fast and whipping it around! 


So we got out her four wheeler from Santa! She did pretty good, but I don't think she quite had the hang of the steering part!

We had a quick Valentine breakfast this morning and the kids opened their treats. Allie Ruth got a new pair of shoes, some lip gloss, and candy. Landon got a new DVD and some candy! Kelly got me some gift cards and I got him a new pair of shorts! 

♥I love you Kelly, Landon, and Allie Ruth!!♥


Friday, February 11, 2011

Fauxtography Friday!

Lesson Two: ISO and Shutter Speed Part One:

ISO is a setting to determine how quickly the image will be captured. The higher the ISO, the quicker it will be captured. The lower the ISO, the longer it will take for the image to be captured. So, higher = quicker, Lower = slower. 

100, 200- good for outdoors or bright lights
400- good for in the shade, overcast outdoors, indoors with a lot of light
800, 1600- good indoors, low-light conditions, sports or action. 

The higher the ISO means more noise. Noise is not good. 

Shutter Speed is how quickly the shutter operates. Think of it like a door and your shutter speed controlling how fast of slow the door opens and closes. 

Use a tripod for SS that is slower than 1/50th of a second. Use a slow SS to portray a blurred subject or surroundings. If you are hand holding your camera, your SS should be at a minimum of 1/60th of a second. Hold your breath while taking the photo to help keep yourself still. If you or your subject is wiggly, increase your SS. Fast moving objects will need a faster SS, around 1/1000 or higher to freeze the action. 

Kitchen Sink Test:
Ok, looking back on these pictures, I failed at this! Mostly, I am going to blame an unnamed 5 year old that was  in my face while I was trying to do this:) I think I should get extra credit for using a wine glass, though!! I am glad this is just practice and I can see the mistakes.


SS 1/80 ISO 200
(my ISO should have been 400)


SS 1/200 ISO 100
( I am not sure how the ISO changed to 100, but should have been 400)


SS 5 ISO 100
Taken with a tripod
(again wrong ISO)

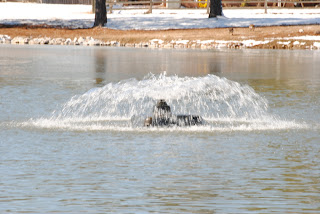
Now I switched my lens and went over to the park to use the fountain. 
( I was by myself:)


SS 1/80 ISO 200


SS 1/1000 ISO 200


Thursday, February 10, 2011

Snow Day Number...


I don't even know what number this is anymore! This week we got out early on Monday for snow, then out early on Wednesday and out all day on Thursday. Tomorrow is yet to be determined, but who cares, its FRIDAY!! 


We have had so much fun in the snow!


I have heard from several people that they are sick of the snow. We really have had a lot this year. I am totally content with it. I usually do not like January or February and counting down the days until spring. But not this year! I guess it is because of the kids and their age, its just so fun seeing their excitement! 


They love to play in the yard and over at the park. We have some great sleds that were Kelly's when he was a kid! 


Allie Ruth was interested in the park again and really interested in the geese today!


I could write a whole post on why I do not like these geese!!

AND...

Allie Ruth's new room furniture:


New bed and chair in the corner. The doll was made for me by my Mom's aunt Suzy and matches a watercolor painting that my Dad gave to my Mom. The chair is from my Memaw's too. Its perfect. We rock and read books at night. I am loving the bed and glad its smaller for Allie Ruth. 


Her new dresser! It has a mirror but we did not put it up yet. 

and...


Allie Ruth's crib that I am not taking her out of until she is 5! LOL:)
Its the same crib we used for Landon. Its from our dear friends Ryan and Amy. Both of their kids slept in it and they were nice enough to let us use it!


Tutorial Thursday!

Bleach Pen T-shirt!

What you will need:


A bleach pen and a t-shirt.
The bleach pen can be found on the laundry isle at the grocery store for around $3. I picked a plain navy blue t shirt. 


I decided on a butterfly design and made a pattern for it. I taped it down on the shirt so it would stay in place. You also need to put a piece of cardboard inside the shirt to keep if from going through to the other side. Unless you wanted to go through to the other side of the shirt, that could be cute.


Start tracing your design with the bleach pen. Have a paper towel handy to wipe away extra and a tooth pick to pop any air bubbles.


I added a few free form designs to mine. You have to remember that the pen is not going to make a perfect line and it does spread some. I let my dry for about 3 hours. I have heard of some people letting it dry a much shorter time and some people letting it dry up to 6 hours. When you are ready, wash off the bleach pen in the sink with the sprayer. Then put it in the wash by itself, just in case, you don't want to mess up any other clothes. 

When its dry:


You will have a cute new shirt!!! 

Now somebody come and yank the bleach pen outta my hand!!